
Illustration by Aron Rook
Back in 1980-something, during my elementary school years, most teachers devoted a few art classes to creating Valentine’s Day cards and other crafts every February. Then when the day finally arrived, we slotted heart-shaped candies and trinkets fastened to pink and red cards full of puns and wordplay into construction paper-covered shoeboxes.
Then there was the anticipation of opening cards from friends, and maybe even your crush. Social awkwardness oozed everywhere like chocolate melted to a candy wrapper.
In my shoebox, I remember noticing which items were “keepers.” Bonus points went to the moms who DIYed their kids’ valentines, making more of an effort than my own stay-at-home mom who went to K-Mart the night before to purchase the last plastic packet of Super Friends valentines with Batman quipping things like, “You drive me batty” and Aquaman feeling bubbly.
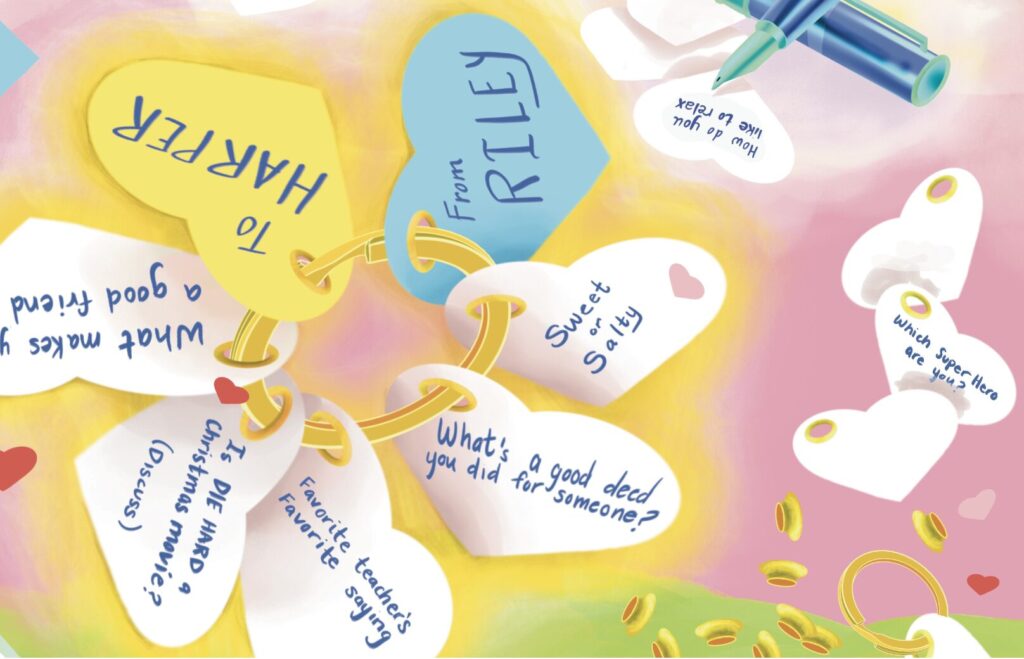
When I asked my daughter about her favorite valentines, I showed her the conversation starter keychain I kept from her childhood. “I was looking for that,” she said, grabbing it from my gripped fist. She now keeps it at her college dorm, spawning late-night chats well into the wee hours. That makes this craft a keeper AND a grabber.
Even back before kids’ faces were glued to iThis and iThat, talking to peers wasn’t natural for some of us. It can be hard to start a conversation. Even when you navigate through your icebreaker topic, keeping a conversation going is a learned skill. This handy prop will encourage your kids to be interpersonally interactive.
Everything you need to DIY your own conversation starter keychain is at the craft store or from online retailers:
- 2-inch heart-shaped paper punch
- Pinking shears
- Grommet eyelet pliers kit, with metal hole reinforcements
- Laminator
- Card stock, 2-4 mm, white and colored
- Fine marker
- Keychain rings
Directions:
- Punch two hearts out of the colored cardstock using the heart-shaped paper punch. This will be the bread for your keychain sandwich.
- Write something clever on the front and back, like, “Let’s Chat” or “Sweet Talk” or “Happy Valentine’s Day from [Your Child].”
- Laminate each heart.
- Cut a border using pinking shears.
- Use grommet eyelet pliers to punch one small hole in the top left side of each heart in the same spot, simultaneously punching a metal reinforcement into place.
- Punch lots of hearts from the white card stock.
- Punch metal reinforcements in the same spot of each white heart.
- Write a question or conversation topic onto each white heart. (See below for sample conversation starters.) Including a second question on the back is optional. So is laminating the middles of the keychain sandwich.
- Stack the hearts into your desired order.
- String all the hearts onto a keychain ring.
The fun part about DIY valentines is that you can personalize the conversation prompts with inside jokes from your class, references to specific teachers, or even send a message to a crush. You can make them silly, serious or anywhere in between.
Here are a few suggestions to get you started:
- What is your favorite…? (song, holiday memory, school lunch, game, hobby, etc.)
- What is the nicest compliment you ever received?
- If you could give your parent/teacher/sibling one piece of advice, what would it be?
- What was a recent act of kindness you noticed?
- In writing your life story, what would the title be?
- How would you make the world a better place?
- Tell me about something that made you laugh so hard that your face hurt.
- What’s the most courageous thing you ever did?
- It’s Freaky Friday. Who are you trading places with?
- Talk about your special talent.
- You’re in a time machine. What year are you traveling to?
- We’re going on a picnic. What’s in the basket?
- What makes you a good friend?
- What’s your favorite teacher’s favorite saying?
Happy Valentine’s Day, dear readers. If I were to send a valentine to you, it would read: “You’re the heartbeat of TheBurg!”
If you like what we do, please support our work. Become a Friend of TheBurg!